
Hip Adduction and Abduction Machines: How to Use Both
In short
The hip adduction machine trains your inner thighs as you bring your legs together. The hip abduction machine trains the muscles that move your thighs outward. For either exercise, set the pads for the correct direction, keep your hips on the seat and control the return. Start with a comfortable range and a light load.
Two machines, almost the same name, completely different directions. Once you know which side of your thighs goes against the pads, the confusion disappears. Here is how to set up each movement, choose a useful weight and add it to your leg workout.
Hip abduction vs adduction: which way do your legs move?
Adduction brings your thighs toward the middle of your body; abduction takes them away from it. You may find separate machines, or one combined machine whose pads rotate for the two exercises. Life Fitness and Matrix both make this kind of adjustable equipment. Check the diagram on your machine before choosing the mode. Equipment sources.
| Exercise | Pad contact | Working movement | Main target |
|---|---|---|---|
| Hip adduction | Inside of your thighs | Bring your thighs together | Inner-thigh adductors |
| Hip abduction | Outside of your thighs | Press your thighs apart | Hip abductors around the outer hip |
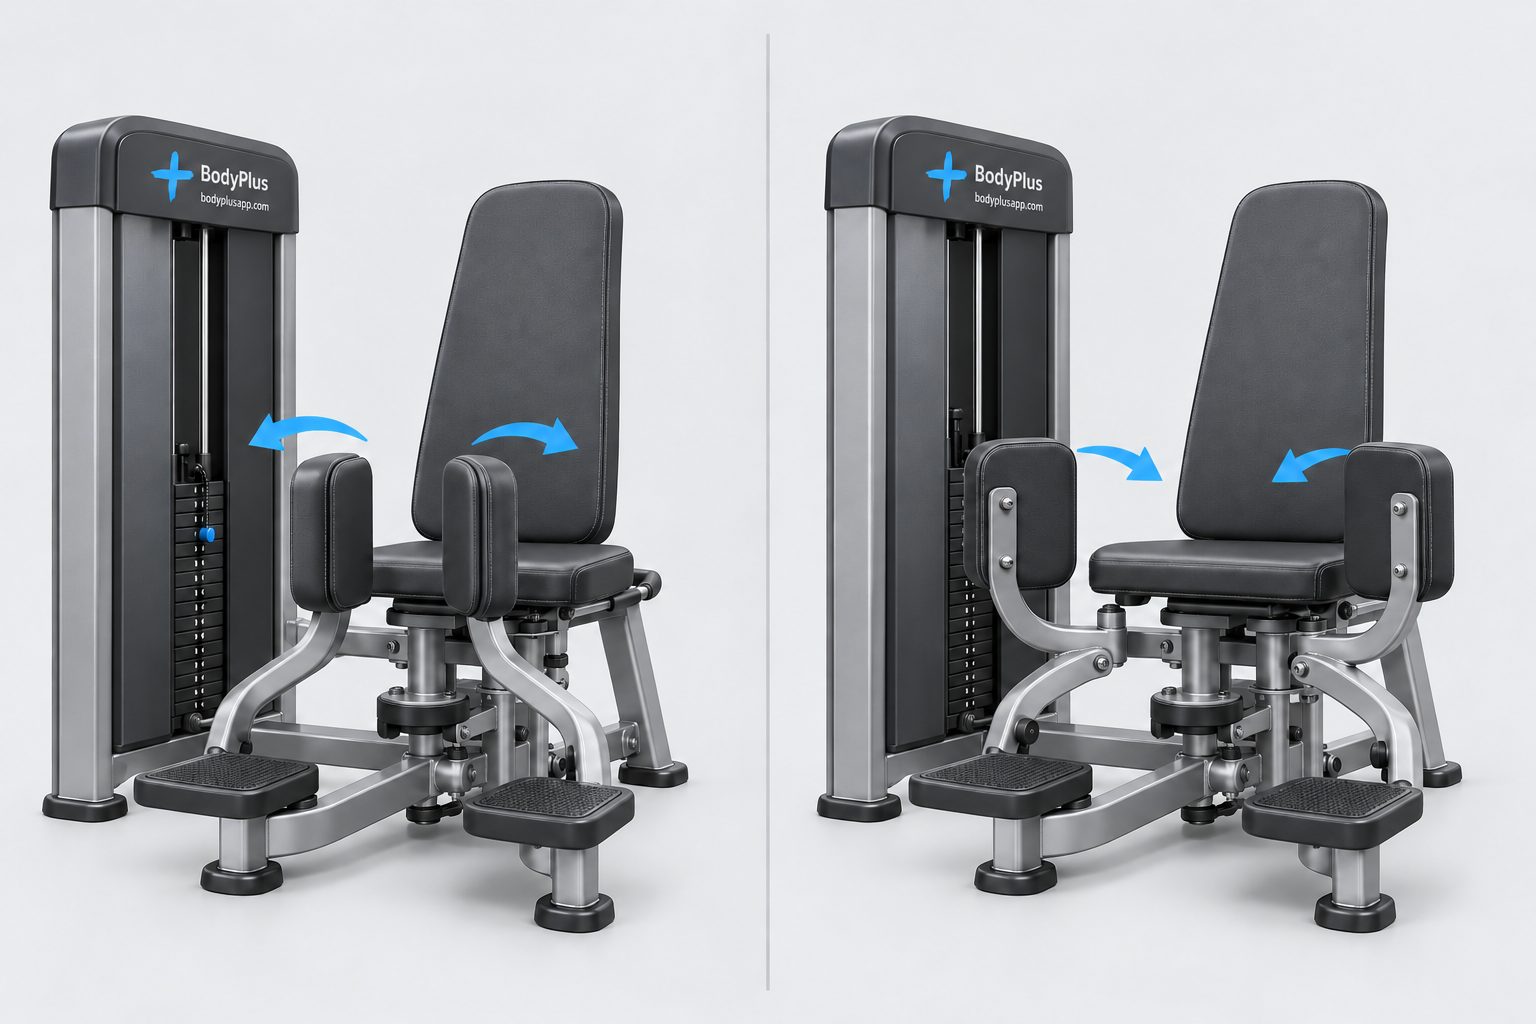
A simple memory cue: adduction adds your legs back together. The seat and weight stack can look identical, so identify the pad contact and working direction rather than guessing from the machine's appearance.
Muscles worked by each machine
Adduction: the inner thighs
The adductor group includes the adductor longus, brevis and magnus, along with the gracilis and pectineus. Their shared job is to bring the thigh inward at the hip. That is the movement you load when you squeeze the machine pads together. Anatomy source.
Abduction: the outer hip
The gluteus medius, gluteus minimus and tensor fasciae latae contribute to moving the thigh outward. The first two are part of the gluteal muscle group. The tensor fasciae latae is a smaller muscle toward the front and outside of the hip. Functional anatomy source.
Knowing a muscle's function is useful; it does not tell you an exact percentage of work during a particular machine exercise. You do not need that percentage to train well. For the bigger picture, see the leg muscles guide.
Which machine should you use?
Choose adduction when you want direct inner-thigh work. Choose abduction when you want direct work for the muscles that move your legs outward. You can include both if your program has room, but you do not have to pair them every time or use the same weight.
Treat them as focused additions to your leg session. A leg press, squat or Romanian deadlift gives your workout a different movement to build around. These seated exercises do not replace that variety. If you are choosing movements for your glutes, the glute exercise guide explains the options.
Set up the machine before the first repetition
- Read its exercise diagram. Check whether it has one mode or two, and identify the start-position and release controls. The manufacturer's setup takes priority over a picture of another model.
- Select a light load while the stack is resting. Push the selection pin fully into the intended plate. Make sure the seat and pad adjustments lock into position.
- Get into the seat using its entry setting. Place your feet on the provided supports and settle your hips and back against the padding. Hold the handles. Do not climb over loaded moving arms.
- Check the thigh pads. For adduction they contact the inside of your thighs; for abduction they contact the outside. Follow the placard for their exact height and position.
- Set a comfortable starting width. Try a light repetition. You should be able to keep your hips seated and move smoothly without forcing a stretch or hitting a hard stop.
Some combined machines need you to rotate the pads as well as move the start-position lever. A lever alone may not change the exercise. Let the stack settle before changing settings. Manufacturer setup guidance.
How to use the hip adduction machine
- Sit with the pads against the inside of your thighs and begin with your legs comfortably apart. Keep your feet on the supports.
- Keep your hips steady against the seat and hold the handles without pulling your body forward.
- Bring your thighs together smoothly against the pads. Breathe out as you squeeze; keep breathing throughout the set.
- Finish within the machine's intended range. You do not need to crash the pads together to complete a repetition.
- Let your thighs open again slowly. Stay in control of the return instead of allowing the weight to pull your legs abruptly apart.
- Repeat with the same starting width. End the set before you need to bounce or slide on the seat.
The return is part of the exercise. Give it as much attention as the inward squeeze. A manageable load makes that much easier. The PureGym adduction demonstration also shows the entry lever and controlled return.
How to use the hip abduction machine
- Set the pads against the outside of your thighs. Start at the width indicated by your machine; your knees do not have to touch.
- Keep your back supported, hips on the seat and feet on the footrests. Hold the handles.
- Press your thighs outward with a smooth movement. Let the legs move while your torso stays quiet.
- Stop at a comfortable, controlled end position. Do not force the arms wider by lifting your hips or twisting your body.
- Bring your thighs inward slowly against the resistance until you reach the starting position.
- Keep that range consistent for the remaining repetitions.
Use the seated position shown on the machine first. Standing on the footrests, hovering above the seat or folding far forward changes the setup. You do not need those variations to begin. Follow the machine's intended-use instructions.
Common mistakes and simple fixes
- Choosing the wrong pad direction: check where the padded surface meets your thigh before starting.
- Opening too far on adduction: reduce the starting width until you can return smoothly while keeping your hips seated.
- Bouncing or slamming the stack: lower the load and slow the direction change.
- Lifting or sliding your hips: reset your seat position. If you still cannot stay supported, use less weight or a smaller comfortable range.
- Using the same load for both exercises: choose each load separately from the repetitions you can control.
- Comparing numbers across machines: keep your log tied to the specific machine and its settings. Different designs make the plate label a poor universal strength comparison.
Sets, reps and a practical starting plan
For an adult who already has a leg workout, try 2 sets of 10–15 repetitions of the movement you want to add. If you choose both, use that starting dose for each and assess how it fits your session. Rest about 1–2 minutes, or longer if needed to repeat the same quality. These numbers are a practical coaching example, not a proven optimum for these machines.
Start with an easy practice set. For your working sets, choose a load that makes the later repetitions challenging while you could still do roughly two more with the same technique. Learn the movement before pushing the effort higher.
Place the machines after your main leg exercises when those lifts are the priority. General ACSM guidance supports putting larger, multi-joint work before smaller, single-joint work and increasing resistance as your capacity improves. It does not prescribe one best hip-machine routine. Programming source.
A log example that makes progress easy to judge
Record the exercise, machine, seat setting, starting width, load and repetitions. For example: “Adduction, machine A, start notch 3, 30 lb: 12 and 11 reps.” Keep abduction on a separate line with its own load. The sample weight illustrates a log entry; it is not your recommended starting weight.
Next time, keep those settings and aim to add a controlled repetition. When both sets reach 15 with the same range and some effort left, try the smallest available weight increase. If the new load makes you shorten the motion or rock your body, return to the previous load. A heavier plate with a much shorter repetition is not the same performance.
Alternatives without the seated machine
You can practice the same basic directions with a low cable and ankle cuff. For abduction, attach the leg farther from the pulley and move it outward. For adduction, attach the leg nearer the pulley, begin slightly out to the side and bring it inward. Hold a stable support and keep your pelvis steady.
Without a cable, side-lying abduction raises the upper leg; side-lying adduction raises the lower leg with the upper leg supported in front. Begin without added weight. These are options for the same movement directions, not exact replacements for the load or support of a machine. Cable exercise source; side-lying exercise sources.
Safety: finish the set and leave the machine comfortably
Use a light familiarization set, check locked adjustments and keep your hands clear of the moving arms and weight stack. Stay seated with supported feet. End the set if you lose control, cannot keep your hips settled or feel pain.
After the final repetition, bring the arms back under control and let the stack settle. Use the model's start/release control to reach its exit position before standing. Do not step over moving pads or try to move a selection pin while the stack is lifted. If the release is unfamiliar, pause and have gym staff show you how that control works. Machine safety source.
Make the movement clear, then build the load
Bring the thighs together for adduction; press them apart for abduction. Set up the pads properly, keep the return smooth and track each movement separately. That gives you a useful, repeatable addition to your leg training. Start there—you can make the exercise challenging without making the setup complicated.
Questions about hip abductor and adductor machines
What does the hip abductor machine work?
It loads outward movement at the hip, involving the gluteus medius, gluteus minimus and tensor fasciae latae. It is not the same movement as bringing your thighs together on the adductor machine. See the muscle explanation above.
Do I need to do both exercises?
No. Choose the direct work that fits your training goal and available time. If you use both, adjust the machine for each direction and select the loads separately.
Should I lean forward on the hip abduction machine?
Begin with the supported seated setup on its placard. Keep that position consistent while learning the motion. A different torso angle is not automatically better, and a stronger sensation alone does not prove a better result.
What if the machine will not close when I finish?
Let the load settle and use its start-position or release control as instructed. Do not force the arms or climb over them. Have gym staff demonstrate an unfamiliar release.
Sources and evidence limits
Sources checked October 4, 2026. Equipment instructions describe particular models; follow the instructions on the machine you use. Anatomy explains movement, while general training guidance supports the programming principles. None establishes a guaranteed result or a single best routine for everyone.
- Life Fitness Axiom dual-mode machine and Matrix Fitness official setup demonstration: mode and pad/start-position adjustments.
- Cybex Eagle Hip Abduction/Adduction owner's manual: intended use, exercise directions and equipment safety.
- OpenStax, pelvic girdle and lower-limb muscles: adductor anatomy and function.
- Al-Hayani, functional anatomy of hip abductors (2009): anatomical muscle actions, not a machine training trial.
- ACSM progression models for healthy adults (2009): general exercise order and progression.
- Nautilus NT-CC1 manufacturer handbook, pp. 13–14 (archived copy): cable adduction and abduction.
- ACE side-lying hip abduction and UCSF side-lying exercise demonstrations: movement instructions only, not a treatment recommendation.
The information on this page and on this website is intended to provide general information only. The content on this website does not constitute a professional opinion, a recommendation, or a substitute for consulting an expert in a specific field or obtaining a medical opinion. It is not medical advice. BodyPlus is not a medical device. If you have a health condition or an injury, or are pregnant, talk to a qualified healthcare professional before starting. Stop exercising and seek appropriate help if you feel pain, dizziness or other concerning symptoms.